RaceManager
- Live Results
- Full User Guide
- Draw event from a previous round
- Print Tasks
- Checking computers can Network
- Networking 2 windows computers via a Switch
- Linking Raceman and SprintTimer
- Progressions
- 27100 - Waka Ama NZ - Sprint Nationals 2017 (Midgets)
- 25200 - College Sport - 2015 Waka Ama W6 (Times Only, Champ, Bowl, Plate)
- 27500 - CRNZ - Plan I (Seeding Round, Div 1-3, A,B,C Final)
- Installation
Live Results
Live Results is a website you can use to publish your Race Manager results too.
Step 1. Connect Your Account
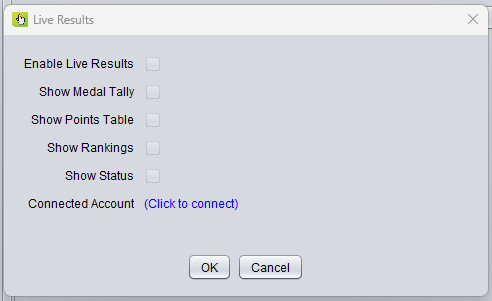
Go to Live-Results > Settings in the menu
If you have already connected your account, you can go ahead to Step 2
Click on (Click to connect)
Contact help@enternowonline.com to get your Live Results Key
Note: Keep a note of that key, incase you need to set up Race Manager again in the future
Enter your Live Results Key, and press OK
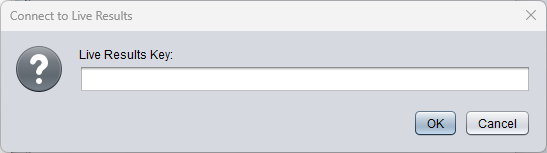
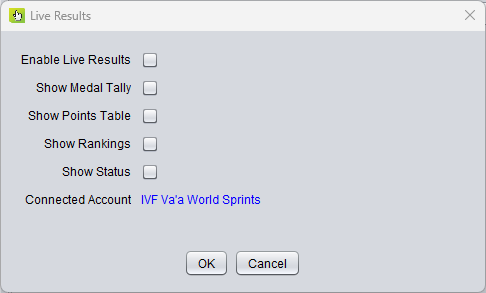
Your account will be verified, and the name of your account displayed on the screen
Step 2. Enable Live Results
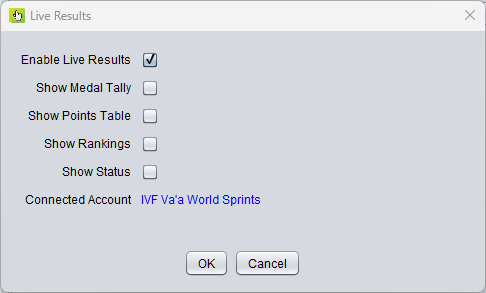
Now tick Enable Live Results
You can also choose from the other settings depending on your event
| Show Medal Tally | Dsplay medal tally page, if the progressions in racemanager you are using support medals |
| Show Points Table | Display a points table page, if the progressions in racemanager you are using support points |
| Show Rankings | Display ranking page, which orders the teams/competitors from fastests to slowest across each event |
| Show Status | Display a page, showing which event is next, which has just completed, and which event should go to boat loading |
Once you have choosen the settings you need, click on [OK]
You will also need to set up one computer as the Race Manager server, only the server will send results to the live results website.
Go to Settings > Other in the menu
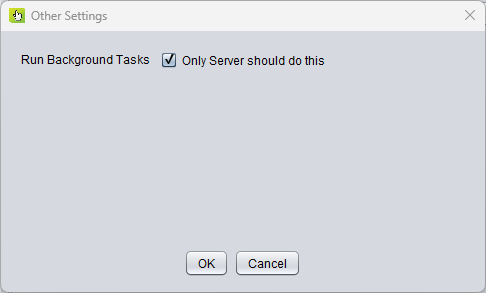
Tick the box that says Run Backgound Tasks, and click on [OK]
Important: If you have multiple computers connected to RaceManager for your event, only 1 computer should have the Run Background Tasks turned on, otherwise you will get unpredictable updates happening.
Step 3. Publishing Live Results
To publish your race schedule / lane draw to the live results server,
Go to Live-Results> Upload all races from the menu, this will send all your races to the Live Results site
This may take 1-2mins depending on the size of your event and the speed of your internet connection.If you go to www.liveresults.co.nz you should be able to see your event on in the list.
After you have done that, everytime you publish a race result, those changes will automatically get set to the Live Results website.
Trouble shooting
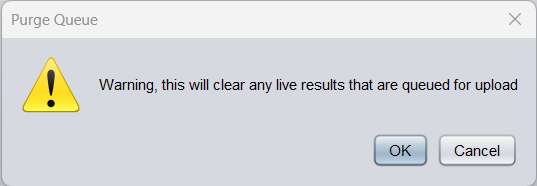
If for any reason your results do not show up on liveresults.co.nz, you can try Live-Results > Purge Queue, and then Live-Results > Upload all races again
Full User Guide
EnterNOW - RaceManager
Copyright EnterNOW Ltd 2003-2014. All rights reserved.
Last Updated: 17/10/2014 11:57 a.m.
Overview
Race Manager is a software application, used to run regattas; it is designed specifically for those with multiple progressions such as sprint regattas.
Warning
Race results and times are important. Do not attempt to use this software application without a practice run first. If you attempt to use it with no prior experience, you run the risks of problems on the day. At the minimum you need to read through this manual and have a practice run, prior to the event, so that you become familiar with the procedures.
Building a Schedule & Draw
Start off by downloading your entries, go to File > Select Regatta
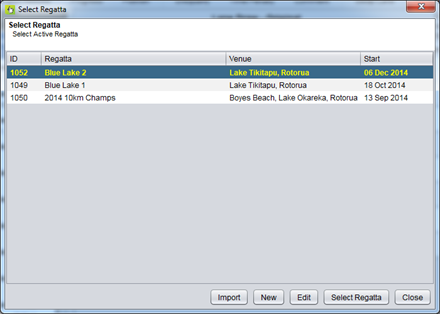
If your regatta is not in the list, then click on [Import]
Find the Web ID (4 digit number ) for your regatta on the website, type that in the box and press [OK]
Highlight your regatta in the list and click on [Edit]
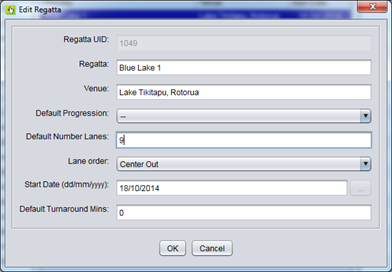
- First type in the number of lanes: 9
- Select the Default Progression from the list
- Type in the Default Turnaround Minutes
Press [OK] to save changes
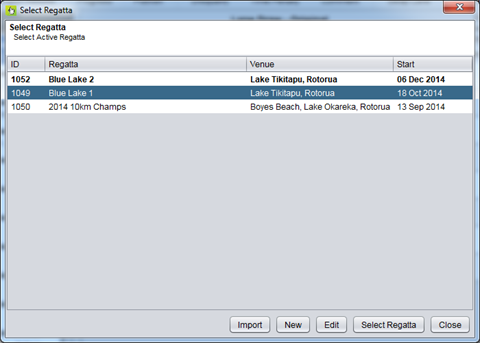
Highlight the regatta, and click on [Select Regatta]
Click on [Close] to close the window

Take Regatta > Web Update from the menu, this will download all your entries, and it will popup a message Webupdate Complete when done.
Temporary Workaround
Close and restart RaceManager
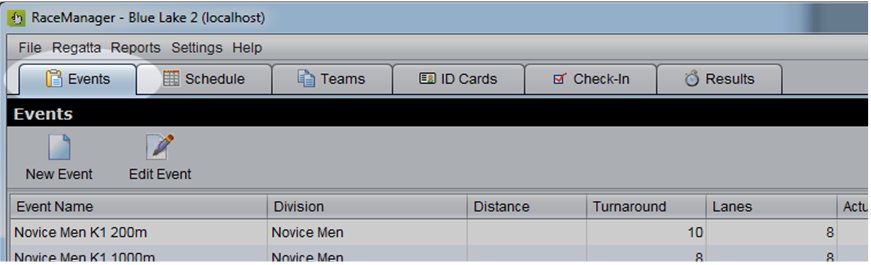
Go to the [ Events] tab
Double click on an event to edit it, set the Turnaround Minutes for each event.
Temporary Workaround
Close and restart RaceManager
Building the Race Schedule
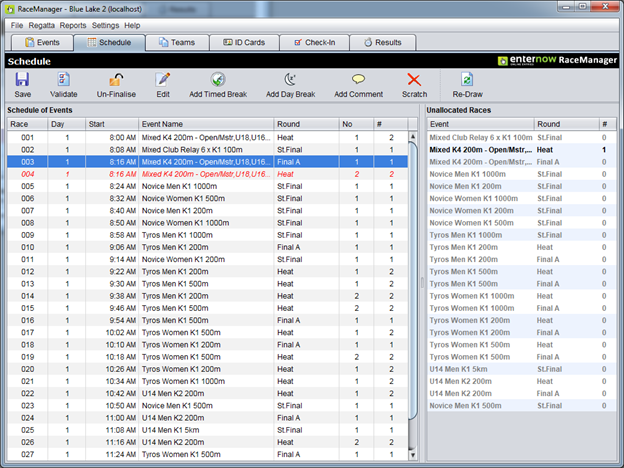
Important: Once you have built your schedule, remember to click on the [Save] button, saving is not automatic on this screen
On the right hand side, the races that have entries will be in bold text, click on a race and drag it over to the left hand side
A red line will appear where the race is to be inserted, let the mouse button go when you have the race in the correct spot, and it will recalculate the start time and race no
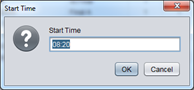
If you want to edit the start time for a race, highlight the race/break on the left hand side and click on [ Edit]
Time format is hh:mm (24 hours format, eg 13:00 = 1pm) need to make sure it is a colon that you type between the numbers. Any changes you make will flow on to subsequent races, up until the end of a race day.
If you put the races in the wrong place, just highlight the race and click on [Remove/Scratch] and the race will be removed from the schedule and put back into the unallocated events (right hand side)
You can add Timed Breaks (eg lunch for 30mins), Day Breaks, and Comments (notes that don’t effect the times in the schedule)
Once you are happy with your draw, make sure to save it.
To print/pdf the schedule, go to Reports > Schedule menu option
Tick the PDF box, and press [ OK]
Generate Lane Draw
Please Note: Only generate the lane draw once you have your race schedule finalised, because if you remove and change the order of races, you will need to redraw these events.
If the race schedule is looking good, then you can go ahead and generate the Lane Draw
This is done from the menu Regatta > Build Lane Draw
This only takes a short time to generate, you can then go to Report > Lane Draw to generate a PDF
Managing Entries
Prior to race day, it is best to make changes to the entries on the website, and then sync those changes into RaceManager.
Take Regatta > Web Update to get the latest changes from the website
If you have deleted an entry from the website, those entries should automatically disappear from the draw once the Web Update is complete.
If the missing teams leave gaps in the lane draw, then highlight the team and click on [Swap Lane] to move them to a new lane and close the gaps up.
If you have added new teams to the website, they won’t appear in the draw until you allocate them a lane.
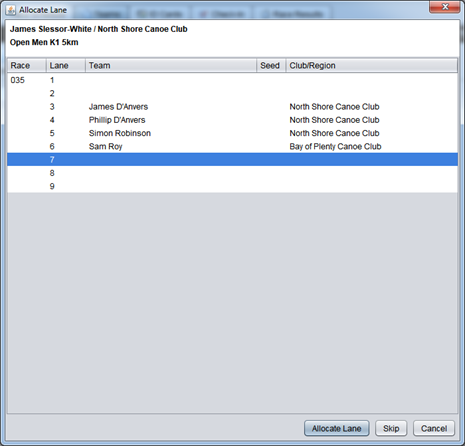
Go to the teams tab and click on [ Allocate Lanes]
Allocate lanes will search for all teams that do not have a lane allocated and prompt you one at a time which lane you would like to put them in.
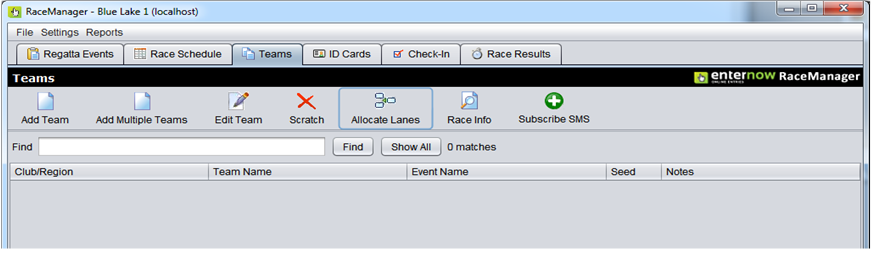
To allocate a team, highlight the lane you would like them to go in, and click on [Allocate Lane] button. If you are not ready to allocate a lane for them click on [Skip] and you can always come back in and allocate lanes again later.
A useful time to skip a race would be if there are no empty lanes and you need to go back out and create another heat for the teams to go in.
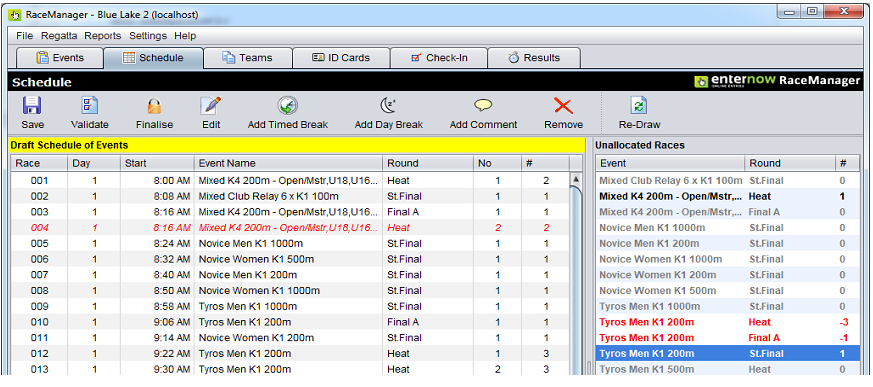
If you have to add another heat to the schedule, go to the Schedule tab. In this example you can see the Open Men K1 1000m St Final is highlighted in red with -1. This means you have 1 too many races in the schedule.
The St Final needs to be replaced with a Final A, and 2 Heats need to be added.
If you double click on the red event, the matching events will be highlighted with blue text on the left side.
Replace the events are required, Save the schedule and then highlight the new heats on the left hand side and click on [ Re-Draw]. This will randomly draw the heats. You only need to do this for the 1st heat from the event and all the other heats in that event will be re-drawn at the same time.
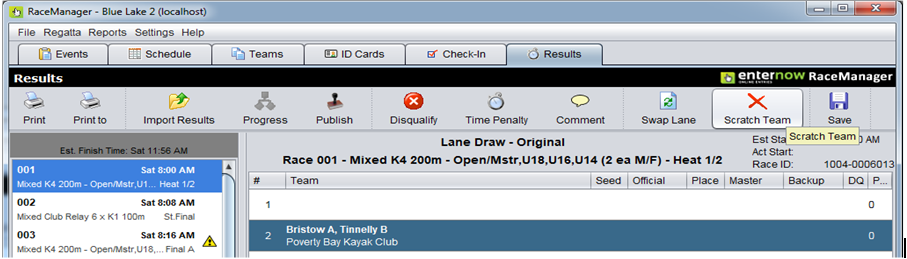
Scratch a team
There are 2 ways to scratch a team. Go to the Teams tab and search by team name

Once you have located the team you want to scratch, highlight the team and click on [Scratch]
If you are not sure, click on [Race Info] and it will tell you which races that team is in.
The 2nd way is to go to Results tab, locate the race and lane and then click on the [Scratch Team] button
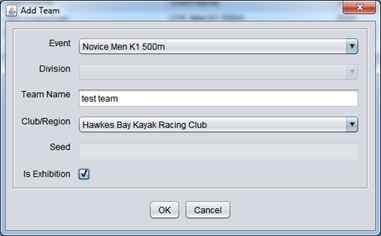
Adding Teams
Go to the Teams tab and click on the [Add Team] button and complete the details.
When you press on OK you will be prompted to allocate a lane for the new team.
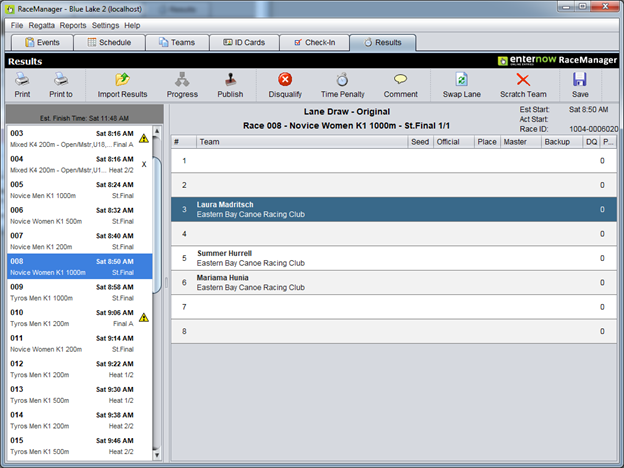
Race Day
This is the main screen that will be used during an event. This where results get imported from the timing system and checked, disqualifications applied and then results are published
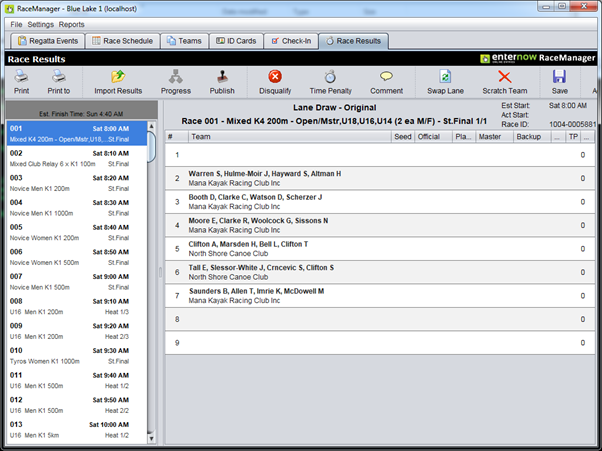
Select a race on the left and it will display the lane draw on the right
Tip: Double click on a race and all races in the same event will be highlighted in blue
Toolbar Options
| Print one copy of currently selected race to the default printer | |
| Print to | Print a copy of the results to the printer that you select |
| Import Results | Imports the results from an external system, such as finish lynx or Sprint timer |
| Progress | Progression qualifying teams into the selected race |
| Publish | Publish results, prints results to the pre-selected printers, sends results to website and sends txt results if configured |
| Disqualify | Add/remove a disqualification from a team. Disqualified teams will not progress any further in the event. |
| Time Penalty | In some events we allow for time penalty instead of disqualification, so that teams may still progress to the next round |
| Comment | Print a comment onto the results, next to a team name, you would use this for warnings rather than a disqualification. |
| Swap Lane | Swap team with another team or empty lane in the same event. Use this if you want to compress the teams into the centre, or if someone races in the wrong lane. |
| Scratch Team | Scratch team from this event. If they have already raced, their results will remain in the system, but they will not progress any further. If they haven’t raced yet, you can re-progress the race and the next qualifying team will progress. |
| Save | Saves the official times and calculates the placing’s accordingly, use this if you manually adjust any of the times. |
Results Publishing - Procedure
- Select the current race
- Import the results
- Compare the master and backup times (if applicable)
- Enter any disqualifications
- Save
- Check again
- Publish
If you make a mistake you can re-publish the results, but if the results are going up live on the web, it is better to check and double check before publishing, rather than sending incorrect information out.
Progression Publishing - Procedure
- Check all the qualifying rounds (eg heats) have been published and are not under protest
- Select the race that you want to progress
- Click on the Progress button
- Check the draw
- Publish
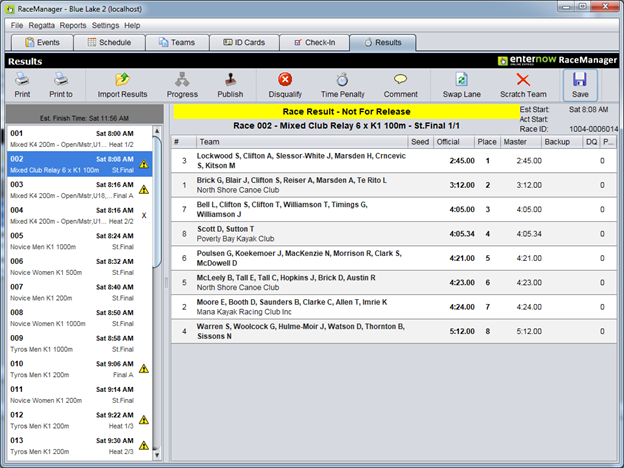
Once you import some results or manually enter results and press Save, or progress a race.
You will notice that the race gets highlighted with a yellow bar, a small yellow exclamation mark will also be show in the race list on the left.
This indicates that the race is in a draft state and needs to be checked before it is published.
Disqualifications / Time Penalties
There are 2 types on penalties you can apply, a disqualification or a Time Penalty
The difference between the two is that a disqualification will stop a team from progressing any further in the event, whereas a time penalty adds a preset amount of time to their race time, eg 10sec, and the team is still able to qualify for subsequent rounds, but may end up in a worse lane as a result.
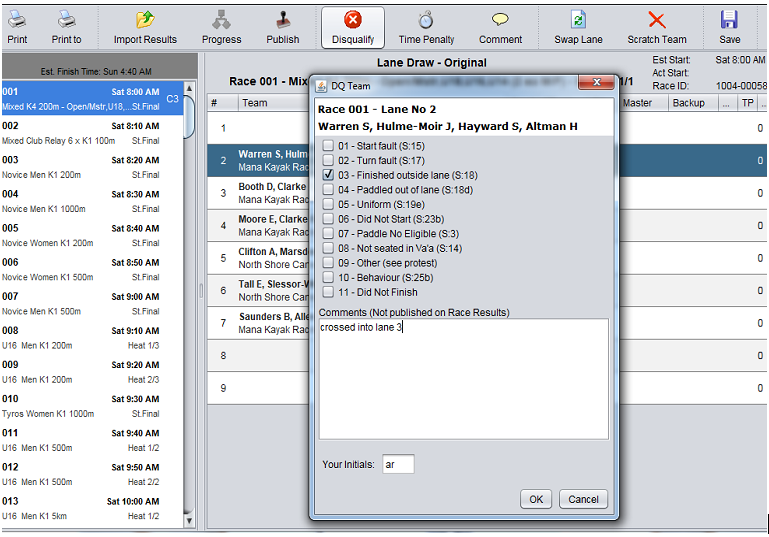
In the Results view, highlight the lane you want the penalty to apply to and click on the Disqualify or Time Penalty button on the toolbar.
Put a tick next to each penalty that applies, make any notes (notes are not printed on the results), enter the initials of the person who created the disqualification, and press OK.
To remove a disqualification, follow the same processes, but just remove the tick.
You can see in this screenshot below, that lane 2 has been disqualified. There disqualified teams time is still shown on the results, so they can see where they would sit in the results, and give them an idea if it is worth protesting on not.
You can also see that lane 7 is a DNS = Did Not Start.
Any team that has no times recorded will be marked as DNS. If a team starts a race but does not finish a race, you need to disqualify them for not crossing the finish line.
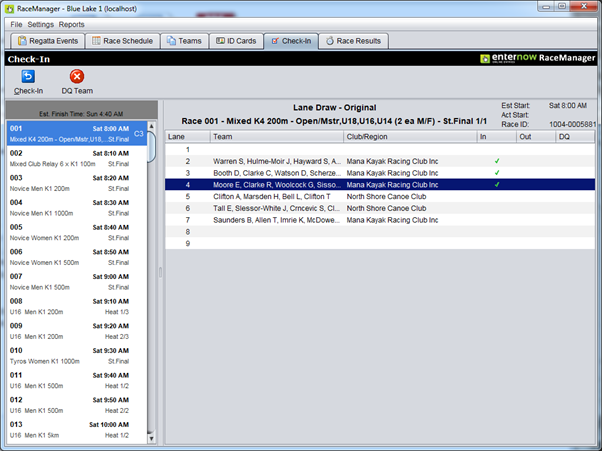
Checkin
Using the checkin functionality is optional, this will record which members were in each team.
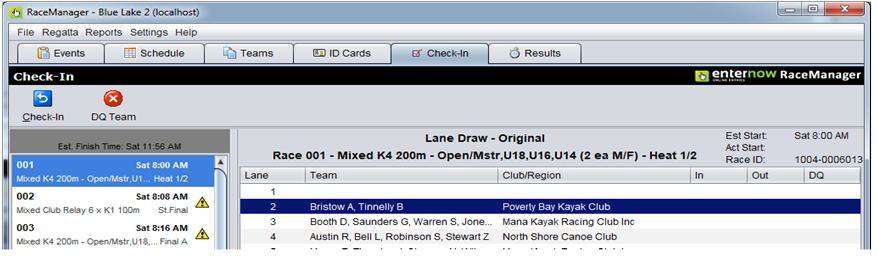
Similar to the Results screen, you click on a race on the left, and it brings up the lane draw on the right hand side.
Double click on a team to check them in.
To check a member in either type or scan their ID card number, if they have a photo in the system it will be displayed. It will also check they are the correct age and gender.
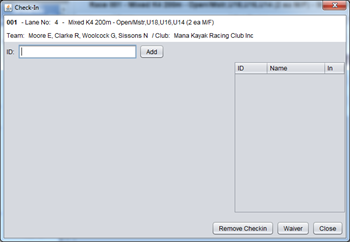
If for some reason an ID won’t work because of an error in the card information, or you wish to allow someone to race outside of the rules, then you can issue a Waiver.
Click on the waiver button and type a reason and the person will be added to the team regardless of their age or gender.
This is also particularly useful for when a replacement has to be made for medical reasons.
If you incorrectly add someone to the team, you can highlight their name in the team list on the right hand side and click on Remove Checkin
Once a team is full, checkin will be complete and you can continue with the next team.
You can see in the screenshot below, that lane 2,3 and 4 have completed checkin, because they have a green tick next to them.
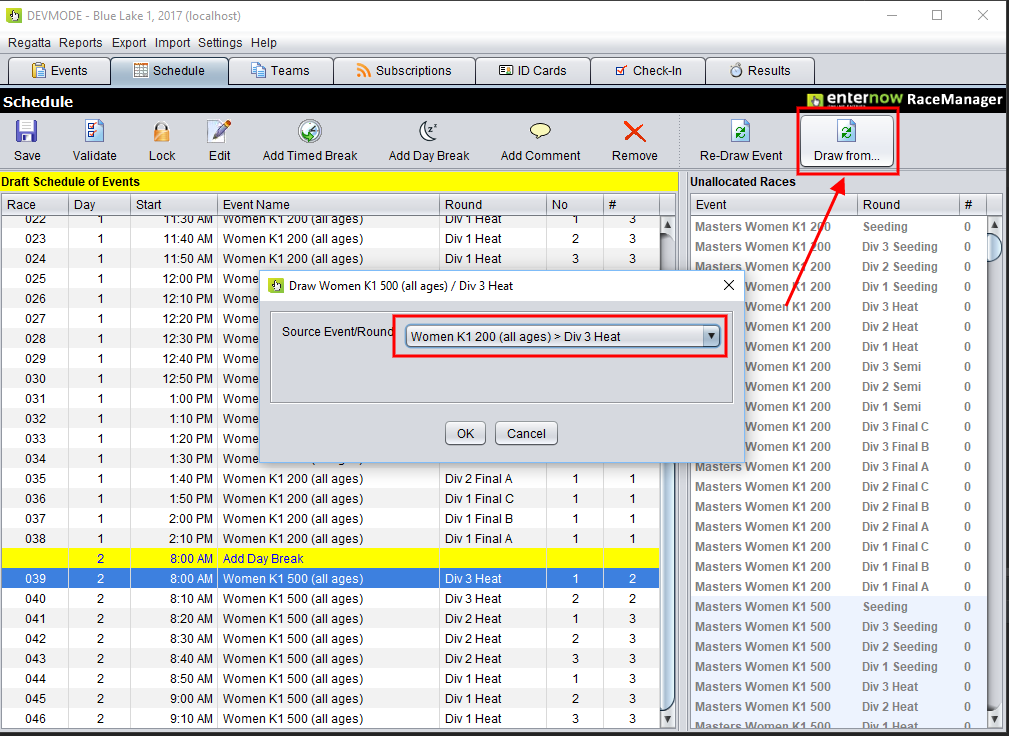
Draw event from a previous round
This feature is useful for events when you have 2 distances for example,
and you have a seeding round, but you don't want to run a a seeding round for both distances.
On the Schedule tab, select the event/round you want to seed teams into.
Click on the Draw from... button and then choose the event/round you want to copy the teams from.
Then click [OK]
Print Tasks
Set up all the printers connected to the server computer, this is the one that will be doing all the printing
Settings > Printers
Create some locations and link each location to an installed printer.
Eg some of the locations we use are Results Tent, Boat Loading, etc
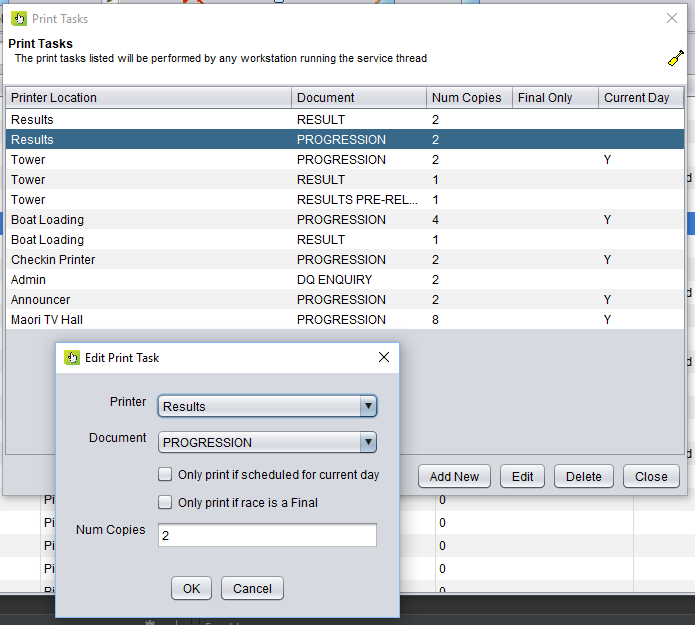
Once you have configured all the printers you will be using, you need to set up some print tasks.
Settings > Print Tasks
Print task control which document gets printed to each printer, how many copies and when it prints.
In this example, we have Results Printer, gets 2 copies of the Results printout (one for the folder, one for the board),
and they also get 2 copies of the Progression printouts.
But if we look at Boatloading print tasks, they are slightly different, they only get progressions, if they are scheduled for the current day.
Eg Heats are today, but semi-finals are tomorrow, then there is no point, printing tomorrows progressions to boat loading.
You can edit the print tasks (not the printers) from any computer running RaceManager, the printers only need to be configured on the computer that is the server.
Checking computers can Network
Click on the [Start] flag or button (bottom left corner of screen)
Type cmd and press [Enter]
You will now see a black box
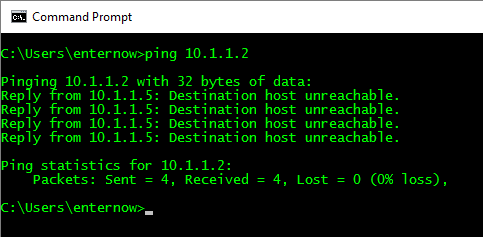
Type ipconfig and press [Enter]
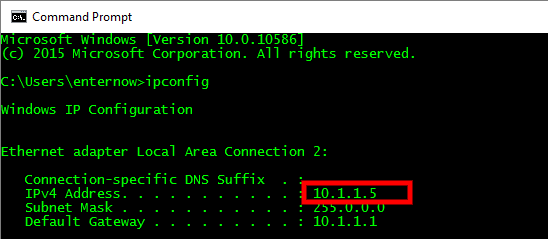
This screen will now show an IPv4 address, these are 4 numbers separated by dots.
They usually start with a 10.x.x.x or 192.168.x.x similar, note this number down.
In this case
Computer A = 10.1.1.5
Repeat the above steps for Computer B
Computer B = 10.1.1.1
Now to check the 2 computers can see each other
In the black box on Computer A
Type ping x.x.x.x (replace the x.x.x.x with the ip address of computer B) and press [Enter]
If it was successful your screen will show 4 lines, Reply from x.x.x.x
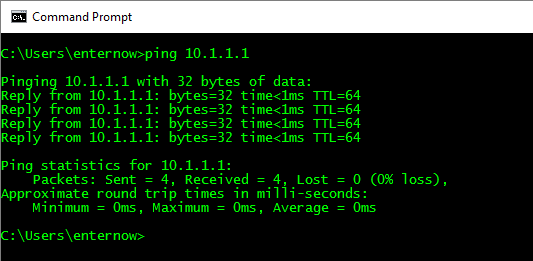
If it was unsuccessful, it will show Destination host unreachable.
Possible causes for being unsuccessful
- Incorrect IP address was typed, check the numbers are correct
- Firewall may be blocking requests. Try disabling the firewall on the computer you are trying to connect to.
- Network cables or wifi is not connected
- There are various other issues, such as routing, which go beyond the scope of this article.
Once you have proven the computers can see each other in one direction, from Computer A to Computer B, repeat the above steps in the reverse direction Computer B to computer A.
If the computers can see each other in both directions, you should be able to share files (if the firewall allows).
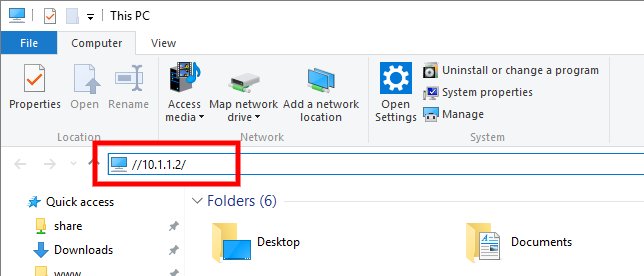
You can access each computer using in the ip address by typing //x.x.x.x/ into the file explorer (where x.x.x.x is the ip address of the computer you want to connect to.
eg in this case //10.1.1.2/ make sure you use forward slashes (leaning to the right)
Networking 2 windows computers via a Switch
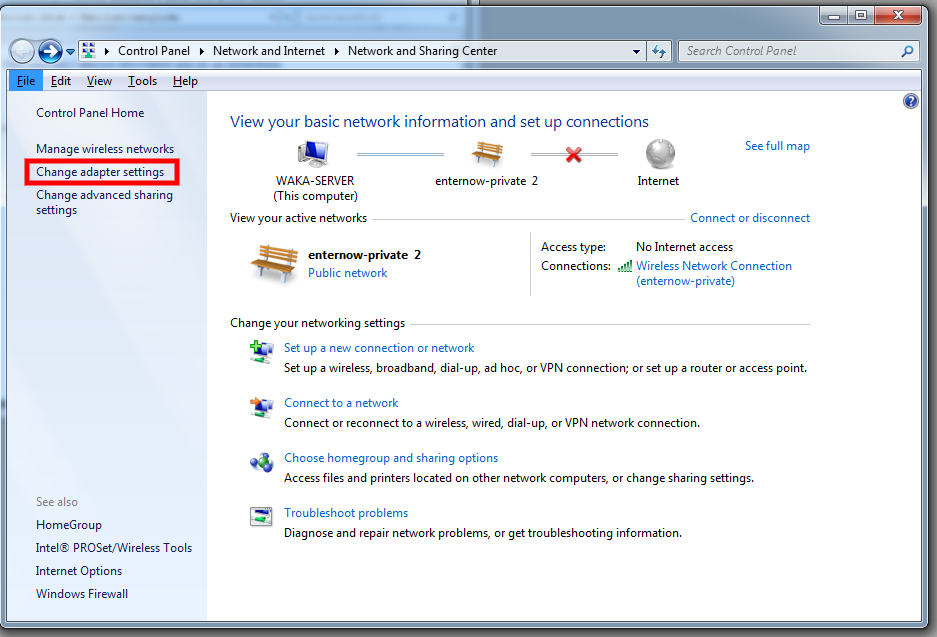
Double Click on Local Area Connection
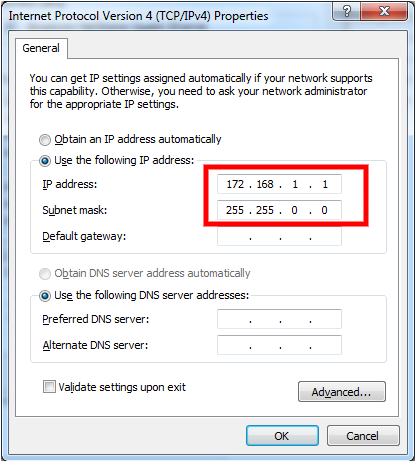
In the next window double click on Internet Protocol Version 4 (TCP/IPv4)
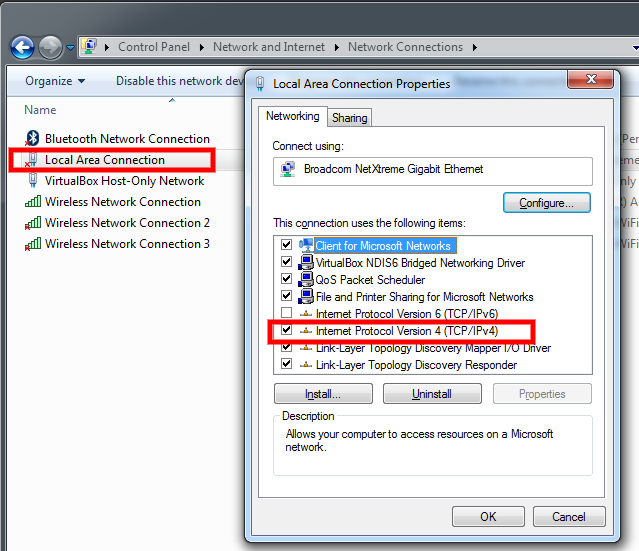
Click on Use the following IP address
On computer A type 172.168.1.1 and press [ OK]
On computer B type 172.168.1.2 and press [ OK]
Connect both computer with network cables to the switch
To test the connection is working
Go to the start menu and type cmd and press [ Enter]
From Computer A type ping 172.168.1.2 and press [ Enter]
and from Computer B type ping 172.168.1.1 and press [ Enter]
The ping should show reply received, if it shows ping timed out, that means it is not working.

Linking Raceman and SprintTimer
In SprintTimer click on [Settings] and copy the Results Path

If you are running SprintTimer on a different computer to RaceManager, you will need to map a network folder that can be used by both. We recommend making that folder on the SprintTimer computer so that if there is a network outage, your results will still be able to be saved, for processing later.
In RaceManager go to Timing > Settings in the menu.
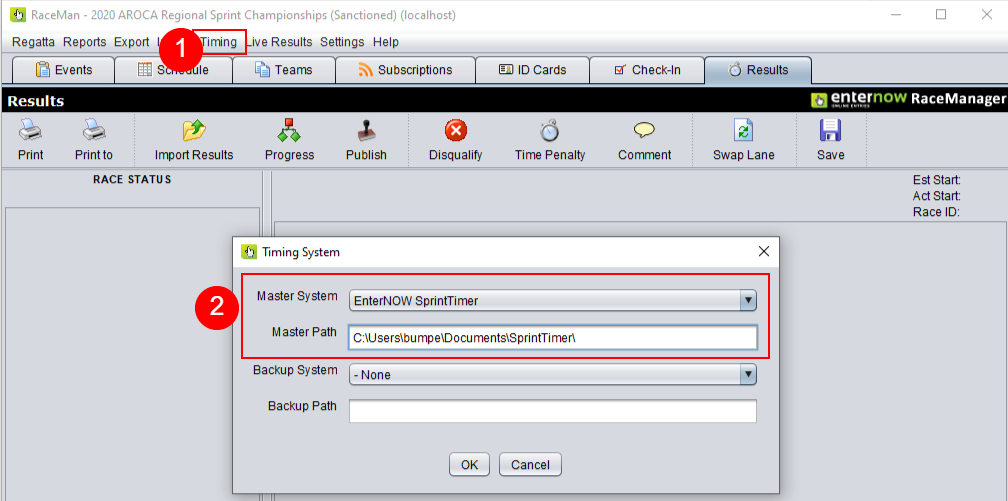
Select EnterNOW SprintTimer from the droplist and paste the Results path into the field below, then click on [OK]
If you are using SprintTimer as your main timing system, then you need to set it up as the Master System. If you have a Finish Lynx or other camera, then it is common to setup SprintTimer as the Backup System
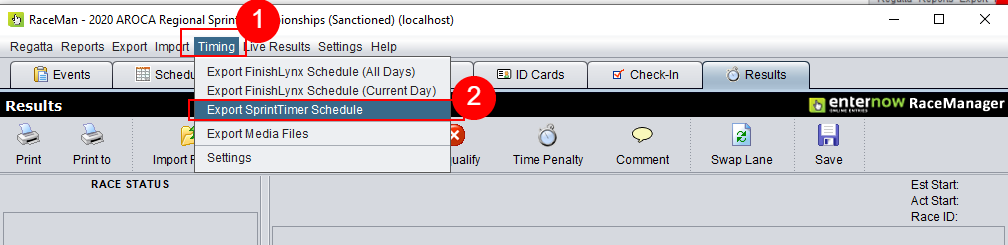
In RaceManager from the menu, click on Timing > Export SprintTimer Schedule
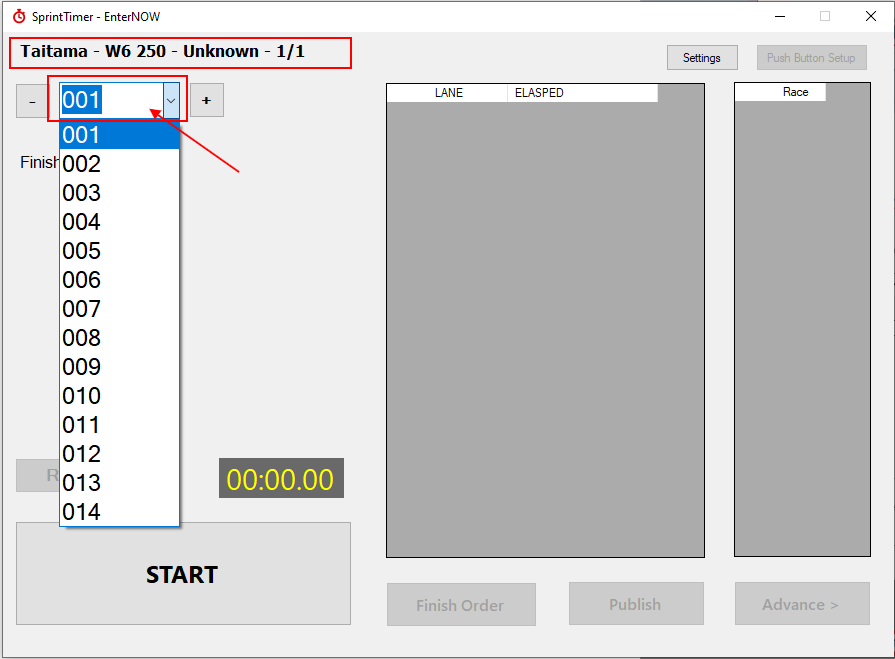
In SprintTimer click on the race droplist and select an race number, that name of the race will be displayed, confirm the event name is as expected.
Progressions
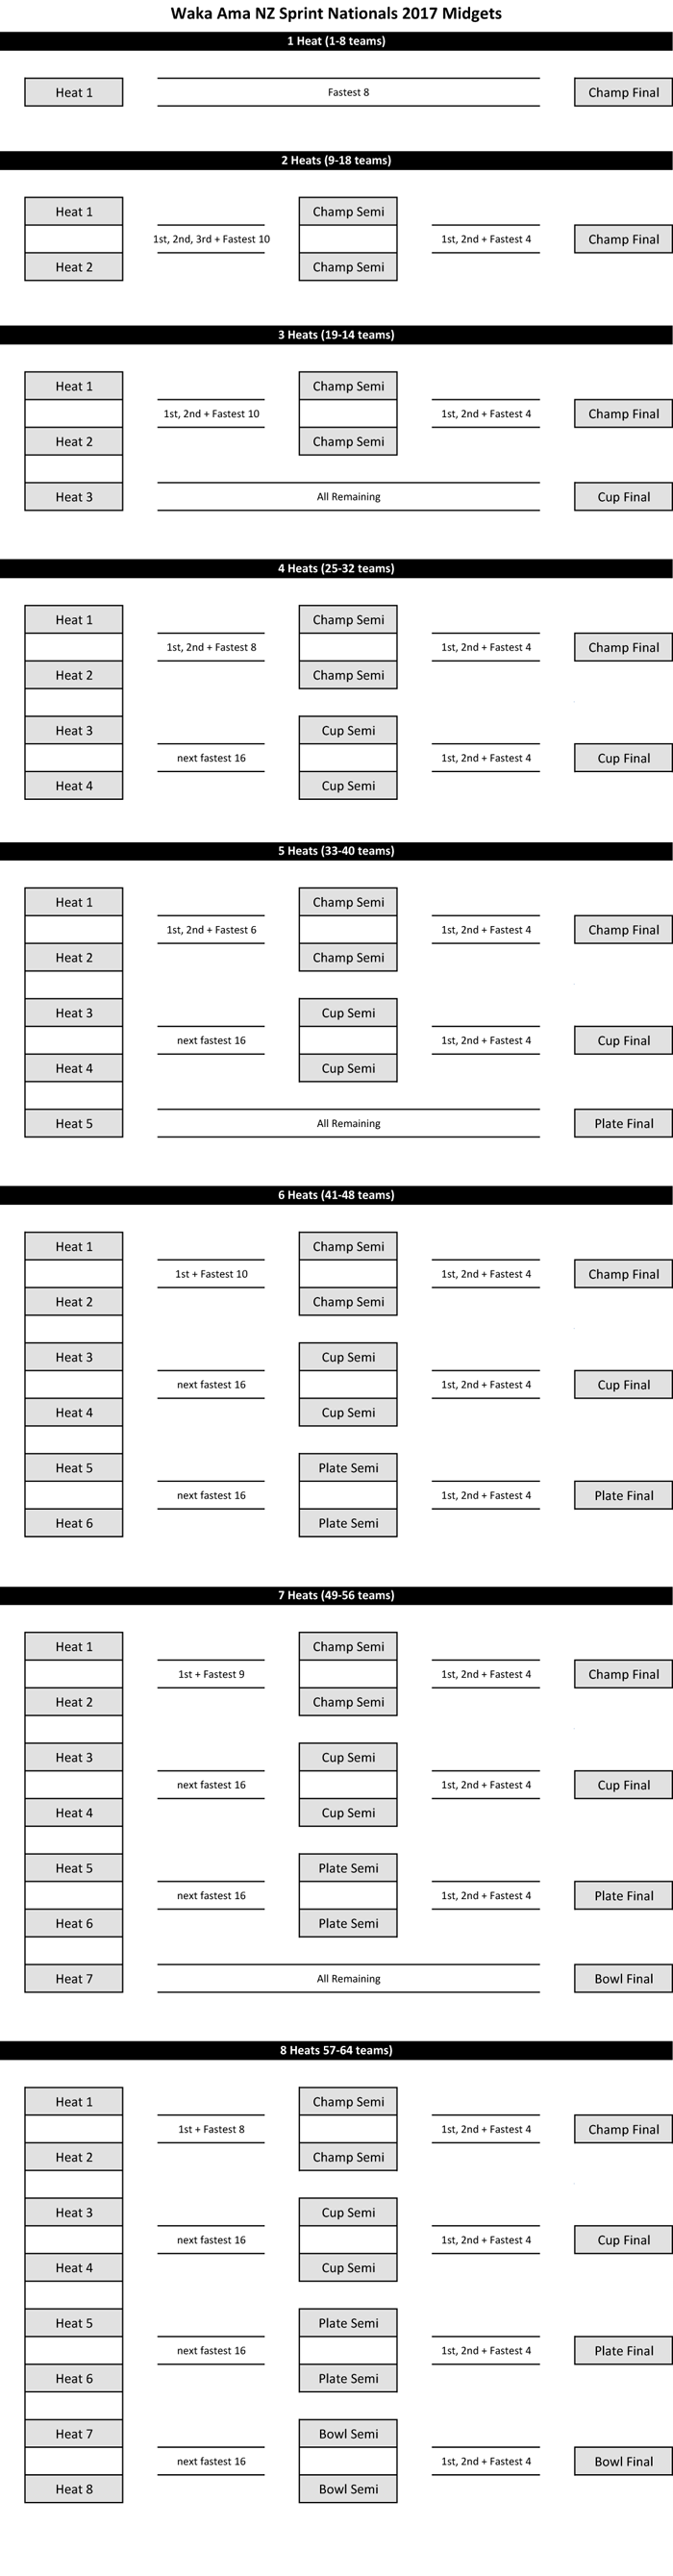
27100 - Waka Ama NZ - Sprint Nationals 2017 (Midgets)
Participation style progression, most teams will get 3 races, all teams will get 2 races.
Num Lanes: 8
Max Heats: 8
25200 - College Sport - 2015 Waka Ama W6 (Times Only, Champ, Bowl, Plate)
Max Number of Heats = 12
Number of Lanes = 8 (can be anything)
| 1 Heat | Champ Final (Fastest 8) |
| 2 Heats | Champ Final (fastest 8) Plate Final (9-16 ) |
| 3 Heats | Champ Final (fastest 8) Plate Final (fastest 9-16) Bowl Final (fastest 17-24) |
| 4 Heats + | Same as heats |
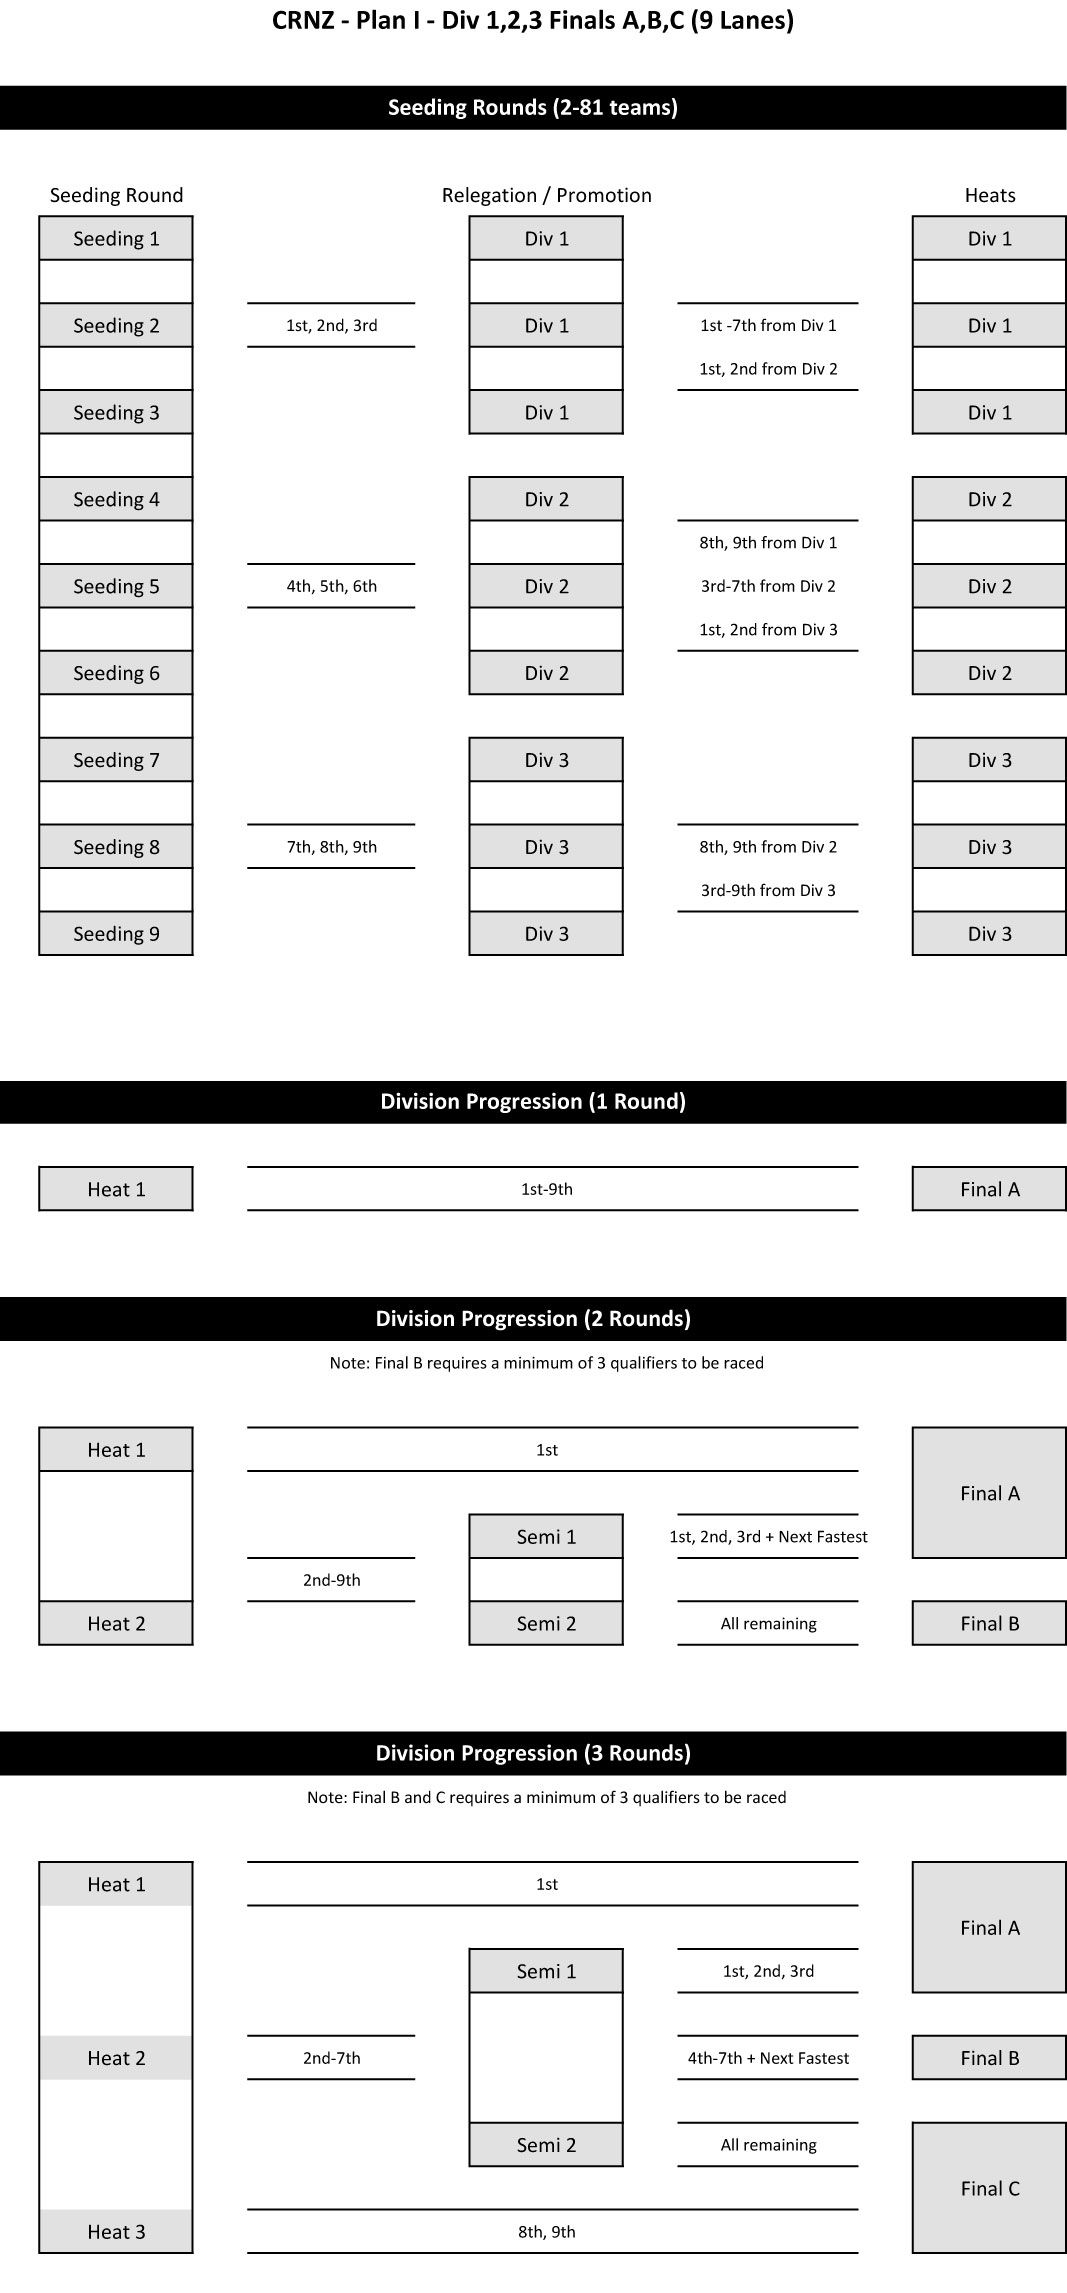
27500 - CRNZ - Plan I (Seeding Round, Div 1-3, A,B,C Final)
Seeding Round, to split the competitors into Div 1,2,3
Promotion/Relegation Round to give competitors a 2nd chance to improve their Div
Heat / Semi / A B C Finals
Designed for 9 lanes, 9 Heats
Installation
1. Firebird Database
RaceManager requires Firebird Database. Firebird will need to be installed on the main RaceManager computer. If you set up multiple workstations, only the main RaceManager computer will need to have Firebird installed.
You can download the database installation file here
https://enternow.co.nz/downloads/raceman/
Run the setup file
Choose English and press [OK]
Click on [Next >]
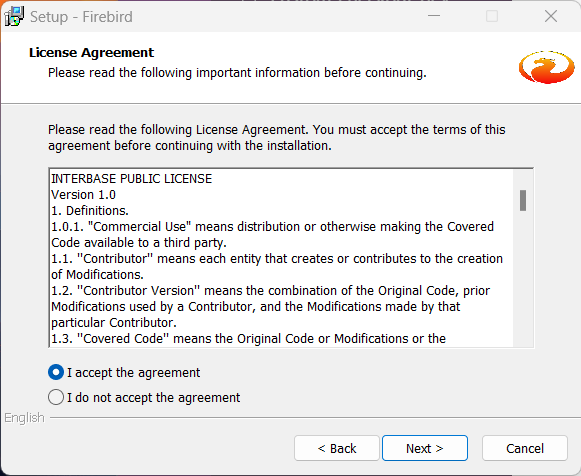
Click on I accept the agreement, then click on [Next >]
Click on [Next >]
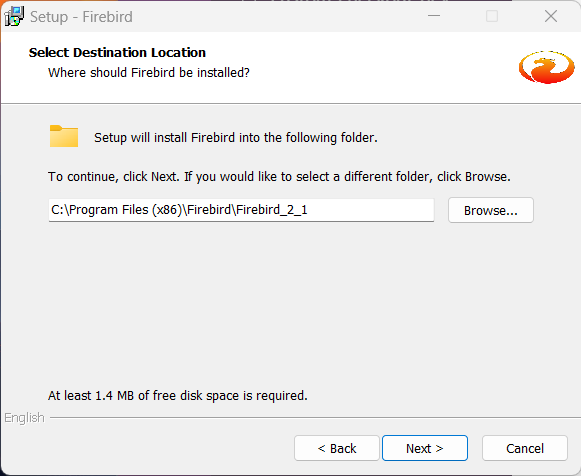
We recommend install Firebird in the default location, that is suggested.
Click on [Next >]
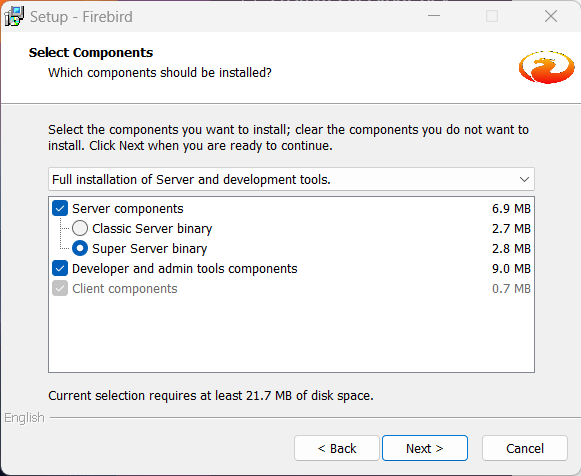
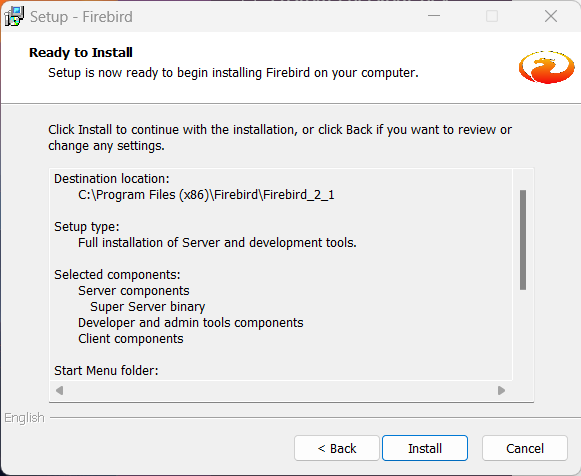
Make sure the selections, match this screenshot,
then click on [Next >]
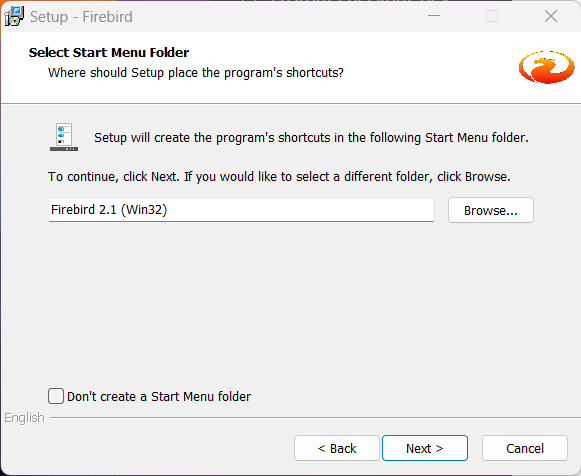
Leave the default Start Menu Folder, and click on [Next >]
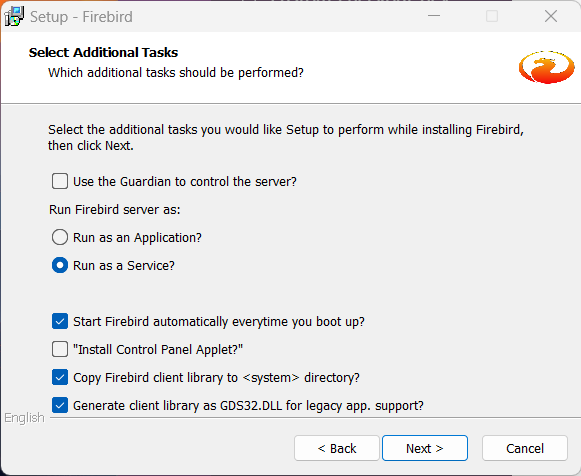
Important, make sure only the following options as selected, as per the screenshot
- Run as a service
- Start Firebird automatically everytime you boot up
- Copy Firebird client library to <system> directory
- Generate client library as GDS32. DLL for legacy app support
Click on [Next >]
Click on [Install]
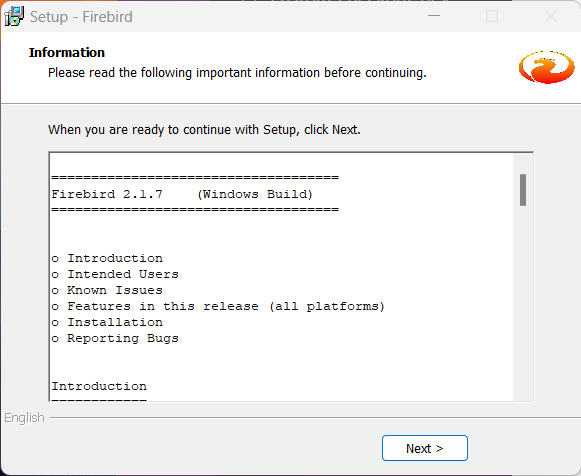
Once installation is complete, you will be shown the information screen
Click on [Next >]
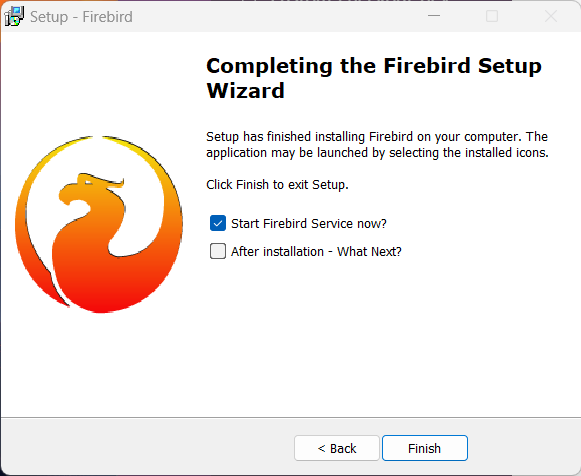
Select
- Start Firebird Service now
Click on [Finish]
2. Java Run Time
(TODO)
3. RaceManager
(todo)
4. Sprint Timer
(todo)